10.1實驗內容
通過本實驗主要學習以下內容:
使用中斷進行串口收發
10.2實驗原理
10.2.1串口寄存器介紹
串口有幾個非常重要的寄存器需要讀者理解。
數據接收寄存器(USART_RDATA)

數據發送寄存器(USART_RDATA)

發送時,除了發送數據寄存器,還有一個移位寄存器,當數據寫入數據寄存器中,移位寄存器空閑的情況下,數據從數據寄存器中轉移到移位寄存器,移位寄存器按照低bit——高bit的順序將數據移位到IO口上。
接收時,接收到的數據保存在數據接收寄存器中,CPU或DMA可以從該寄存器中讀接收到的數據。
狀態寄存器(USART_STAT )
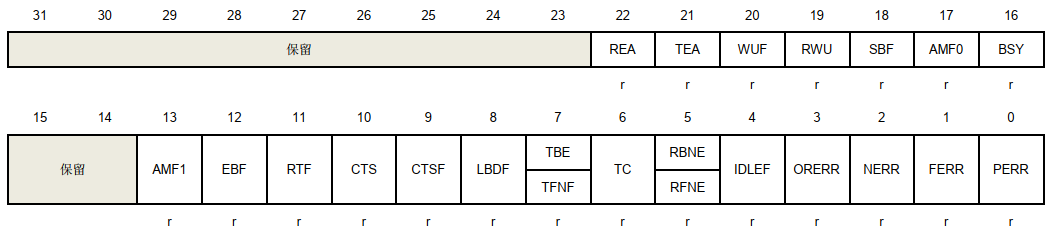
我們需要特別理解TBE、TC、RBNE、IDLE、OREE這幾位。
TBE(發送空):這個位置“1”表示現在可以往數據寄存器中寫數據了,當移位寄存器空閑時,寫入到數據寄存器中的數據則會轉移到移位寄存器中,串口開始對外發送數據;
TC(發送完成):發送數據時,當數據寄存器和移位寄存器都為空時,表示所有的數據都已經完成了,則TC置“1”,所以當連續發數據時,最后一個字節從移位寄存器中發送完,TC才會置起。
RBNE(接受非空):當串口接受到一個字節數據,RBNE置“1”,此時CPU可以去數據寄存器中取數據,當使用了DMA接受,DMA自動將數據寄存器中數據搬走,當數據寄存器數據被讀走/搬走,RBNE位自動清“0”;
IDLE(空閑):該標志位用于檢測接受空閑,當串口接受最后一個字節后,再往后一個字節時間內,沒有接受到新的數據,則該位置“1”;
IDLE一般用于串口DMA接受中,DMA接受中,MCU無法知道發送方的數據個數,所以可以通過判斷IDLE位(或IDLE中斷)來判斷發送方一幀數據發送結束了。 |
5. OREE(溢出錯誤):當RBNE置位的情況,又接收到一個字節數據,則OREE位置“1”。
以上就是串口寄存器的介紹。本實驗就是使用TBE中斷和RBNE中斷來實現中斷收發數據,實驗原理是RBNE中斷用來接受數據,IDLE中斷用于判斷發送方數據結束,TBE中斷用于發送數據。
10.3硬件設計
本實驗使用P1接口的PA9和PA10實現串口功能,硬件設計請見上一章。
10.4代碼解析
10.4.1串口中斷發送函數
在driver_uart.c中定義了串口中斷發送函數:
C
Drv_Err driver_uart_int_transmit(typdef_uart_struct *uartx,uint8_t *pbuff,uint16_t length)
{
__IO uint64_t timeout = driver_tick;
while(uartx->uart_control.Com_Flag.Bits.SendState==1){
if((timeout+UART_TIMEOUT_MS) <= driver_tick) {
uartx->uart_control.Com_Flag.Bits.SendState=0;
return DRV_ERROR;
}
}
uartx->uart_control.Com_Flag.Bits.SendSuccess=0;
uartx->uart_control.Com_Flag.Bits.SendState=1;
uartx->uart_control.p_Send=pbuff;
uartx->uart_control.SendSize=length;
uartx->uart_control.SendCount=0;
usart_flag_clear(uartx->uart_x,USART_FLAG_TC);
usart_interrupt_enable(uartx->uart_x,USART_INT_TBE);
return DRV_SUCCESS;
}
10.4.2串口中斷接受函數
在driver_uart.c中定義了串口中斷接受函數:
C
Drv_Err driver_uart_int_receive(typdef_uart_struct *uartx,uint8_t *pbuff,uint16_t length)
{
__IO uint64_t timeout = driver_tick;
while(uartx->uart_control.Com_Flag.Bits.RecState==1){
if((timeout+UART_TIMEOUT_MS) <= driver_tick) {
uartx->uart_control.Com_Flag.Bits.RecState=0;
return DRV_ERROR;
}
}
if(usart_flag_get(uartx->uart_x,USART_FLAG_ORERR))
{
usart_flag_clear(uartx->uart_x,USART_FLAG_ORERR);
}
uartx->uart_control.Com_Flag.Bits.RecSuccess=0;
uartx->uart_control.Com_Flag.Bits.RecState=1;
uartx->uart_control.p_Rec=pbuff;
uartx->uart_control.RecSize=length;
uartx->uart_control.RecCount=0;
usart_flag_clear(uartx->uart_x,USART_FLAG_IDLE);
usart_interrupt_enable(uartx->uart_x,USART_INT_RBNE);
usart_interrupt_enable(uartx->uart_x,USART_INT_IDLE);
return DRV_SUCCESS;
}
10.4.3main函數實現
以下為main函數代碼:
C
int main(void)
{
//延時、共用驅動部分初始化
driver_init();
//初始化UART為中斷模式,注冊接受完成(IDLE)回調函數
BOARD_UART.uart_mode_tx=MODE_INT;
BOARD_UART.uart_mode_rx=MODE_INT;
BOARD_UART.uart_idle_callback=user_receive_complete_callback;
bsp_uart_init(&BOARD_UART);
bsp_led_init(&LED2);
bsp_led_init(&LED1);
bsp_led_on(&LED2);
bsp_led_off(&LED1);
//使能UART中斷
nvic_irq_enable(USART0_IRQn,2,0);
delay_ms(100);
printf_log('uart interrupt mode sends and receives loopback packets of indefinite length.rn');
//啟動UART中斷接受,最長100byte
driver_uart_int_receive(&BOARD_UART,uart_rec_buff,100);
while (1)
{
//查詢到接受完成回調函數標志
if(uart_receive_complete_flag==SET)
{
uart_receive_complete_flag=RESET;
//啟動中斷方式發送剛接受到的數據
driver_uart_int_transmit(&BOARD_UART,uart_send_buff,uart_receive_count);
printf_log('rn The received data is %srn',uart_send_buff);
memset(uart_send_buff,0,100);
}
}
}
本例程main函數首先進行了延時函數初始化,再初始化UART為中斷模式,接著配置串口BOARD_UART,開啟串口中斷NVIC,這里使用到了IDLE中斷,TBE中斷和RBNE中斷,然后配置串口D中斷接受,最長100個字節,所以我們可以給串口發送100個字節以下長度的數據。在while(1)循環中循環查詢uart_receive_complete_flag標志位,當該標志位為“SET”時,表示IDLE中斷被觸發,一幀數據接受完,最后將接收到的幀數據通過中斷發送方式原封不動發送到串口上。
10.4.4中斷函數
在bsp_uart.c中定義了串口中斷處理函數
C
void USART0_IRQHandler(void)
{
driver_uart_int_handler(&BOARD_UART);
}
在driver_uart.c中定義了driver_uart_int_handler函數:
C
Drv_Err driver_uart_int_handler(typdef_uart_struct *uartx)
{
Drv_Err uart_state=DRV_SUCCESS;
if(usart_interrupt_flag_get(uartx->uart_x,USART_INT_FLAG_RBNE)!=RESET)
{
if(uartx->uart_control.RecCount < uartx->uart_control.RecSize){
uartx->uart_control.p_Rec[uartx->uart_control.RecCount]=usart_data_receive(uartx->uart_x);
uartx->uart_control.RecCount++;
}
else{
usart_data_receive(uartx->uart_x);
uart_state=DRV_ERROR;
//err 溢出
}
if(uartx->uart_rbne_callback!=NULL){
uartx->uart_rbne_callback(uartx);
}
//callback
if(uartx->uart_control.RecCount == uartx->uart_control.RecSize){
uartx->uart_control.Com_Flag.Bits.RecSuccess=1;
uartx->uart_control.Com_Flag.Bits.RecState=0;
uartx->uart_control.RecCount=0;
}
}
if(usart_interrupt_flag_get(uartx->uart_x,USART_INT_FLAG_IDLE)!=RESET)
{
usart_interrupt_flag_clear(uartx->uart_x,USART_INT_FLAG_IDLE);
if( (uartx->uart_mode_rx==MODE_INT && uartx->uart_control.RecCount>0)
||(uartx->uart_mode_rx==MODE_DMA && dma_transfer_number_get(uartx->uart_rx_dma->dmax,uartx->uart_rx_dma->dma_chx)!=uartx->uart_control.RecSize))
{
uartx->uart_control.Com_Flag.Bits.RecSuccess=1;
uartx->uart_control.Com_Flag.Bits.RecState=0;
if(uartx->uart_mode_rx==MODE_DMA){
uartx->uart_control.RecCount=uartx->uart_control.RecSize-dma_transfer_number_get(uartx->uart_rx_dma->dmax,uartx->uart_rx_dma->dma_chx);
}
//callback
if(uartx->uart_idle_callback!=NULL){
uartx->uart_idle_callback(uartx);
}
}
}
if(usart_interrupt_flag_get(uartx->uart_x,USART_INT_FLAG_TBE)!=RESET)
{
usart_data_transmit(uartx->uart_x,uartx->uart_control.p_Send[uartx->uart_control.SendCount]);
uartx->uart_control.SendCount++;
if(uartx->uart_tbe_callback!=NULL){
uartx->uart_tbe_callback(uartx);
}
if(uartx->uart_control.SendCount >= uartx->uart_control.SendSize)
{
uartx->uart_control.SendCount=0;
usart_interrupt_disable(uartx->uart_x, USART_INT_TBE);
usart_interrupt_enable(uartx->uart_x, USART_INT_TC);
}
}
if(usart_interrupt_flag_get(uartx->uart_x,USART_INT_FLAG_TC)!=RESET)
{
usart_interrupt_disable(uartx->uart_x, USART_INT_TC);
usart_flag_clear(uartx->uart_x,USART_FLAG_TC);
if( !(uartx->uart_mode_rx==MODE_DMA && dma_transfer_number_get(uartx->uart_tx_dma->dmax,uartx->uart_tx_dma->dma_chx)!=0) )
{
uartx->uart_control.Com_Flag.Bits.SendSuccess=1;
uartx->uart_control.Com_Flag.Bits.SendState=0;
if(uartx->uart_tc_callback!=NULL){
uartx->uart_tc_callback(uartx);
}
uartx->uart_control.SendCount=0;
}
}
if(usart_flag_get(uartx->uart_x,USART_FLAG_ORERR)==SET)
{
usart_flag_clear(uartx->uart_x,USART_FLAG_ORERR);
uart_state=DRV_ERROR;
}
return uart_state;
}
10.5實驗結果
使用串口調試助手發送一幀數據到MCU,MCU會將這幀數據回發到串口調試助手中。


上一篇:【GD32F470紫藤派開發板使用手冊】第七講 FWDG-看門狗實驗
下一篇:【GD32F470紫藤派開發板使用手冊】第六講 TIMER_3路PWM輸出實驗
- 熱門資源推薦
- 熱門放大器推薦
 嵌入式硬件設計
 5962-8978301PX
設計資源 培訓 開發板 精華推薦
- 【下載】LAT1526 利用SPI的下溢實現回顯功能
- 【下載】LAT1509 STM32G0B1的FDCAN進行通信丟包和多包案例分享
- 【下載】LAT1511 運行Ux_Host_HUB_HID_MSC通過Hub連接U盤讀寫不穩定問題分析
- 【下載】LAT1466 USB x Device HID Standalone的移植
- 【下載】LAT1488 STM32 USBxDevice MSC standalone移植示例
- 【下載】LAT1482 STM32G0單線串口通信幀錯誤問題解析


- 11111111111111
- Protues仿真實例(8051)-4x4行列鍵盤
- 使用 MaxLinear, Inc 的 SP6640 的參考設計
- ch552g核心板
- LTC3622EMSE 5V/3.3V 串聯輸出、突發模式操作中的降壓穩壓器的典型應用電路
- EVAL-AD7401AEDZ、AD7401A 用于數據采集系統的 16 位、20 MSPS ADC 評估板
- LTC3612EUDC 演示板、3A、4MHz、單片同步降壓穩壓器
- LT6656ACDC-2.048、2.048V 2 端子電壓基準電流源的典型應用
- AM2M-2424DH30-NZ ±24 Vout、2W 雙路輸出 DC-DC 轉換器的典型應用
- AM3G-0515SZ 15V 3 瓦 DC/DC 轉換器的典型應用


 京公網安備 11010802033920號